Selling online on groups will often be many times more effective than selling on personal pages. However, how can you post a sales post on a Facebook group to quickly reach potential customers effectively? In this article, Ninja will provide detailed instructions auto post on Facebook groups with Ninja Auto Post Client software. Let's follow along!
Ninja Auto Post Client is an auto post on Facebook groups software. Not only does it support automatic posting, but it also helps find potential customers for those doing online business effectively.
Some outstanding features of Ninja Auto Post automatic posting software include:
- Automatically post to Facebook including Personal page, Group, and Facebook Page.
- Automatically search and join groups according to target, according to user's customized needs.
- Post articles automatically according to schedule and available content, and invite friends to like the Page.
- Spam customer messages to a series of friends and UIDs without worrying about your account being locked.
Using Ninja Auto Post posting software will bring significant benefits to users such as: saving time, increasing efficiency, increasing interaction, and easily managing posted content for business activities. effective on Facebook.
To auto post on facebook groups using Ninja Auto Post software, you just need to do the following:
Step 1: Install Ninja Auto Post Software:: https://tai.ninjateam.vn/ninjautopost.zip

Step 2: Unzip the file and Double-click to open the software, then enter your Login Name and Password ⇒ then Log in to the software.
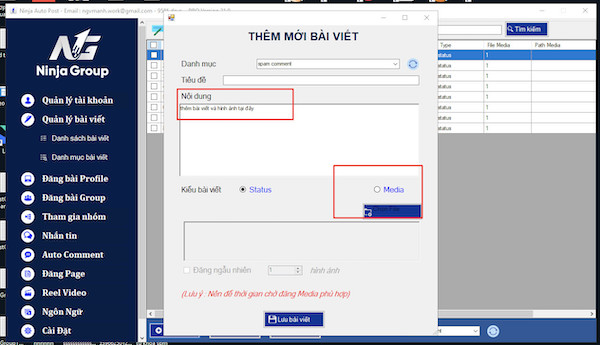
Step 3: Click Manage posts
- Select Article Category ⇒ Add
- Fill in the category name ⇒ Save
- Go to Manage articles in the "manage articles" section ⇒ select Add to add articles to the newly created category.
- Select a category to add articles
- Fill in the article title
- Write the content you want to post to Facebook groups.
- Select Post type.
Note: If you only post content, select Status, and if you post photos or videos, select Media.
- Click Save to have the article saved on the system.
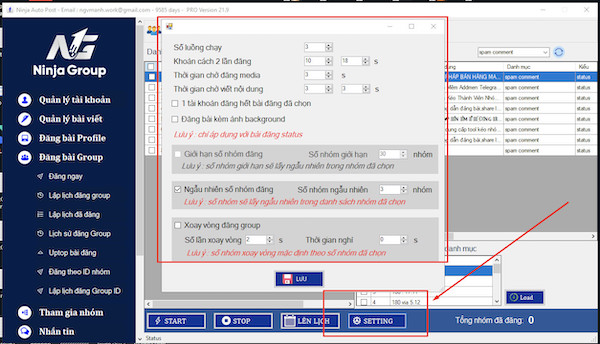
Step 4: Select Post to Group ⇒ Post now
Post to a random Facebook group: Setting ⇒ Setup posting configuration as shown => Click Save.
Step 5: Post to the group
- Sign in to your posting account
- Select the article you want to post
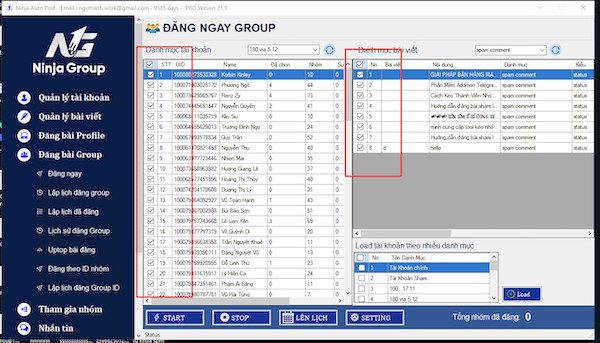
- Click on Start.
So with just 5 steps, you can post to a random Facebook group that your account has previously joined. You choose the appropriate posting format to suit your needs.
Just like posting to random groups, posting to selective Facebook groups also requires the same steps. The only difference is that in step 4, instead of choosing to post to a random group, here you choose to post to a designated group.
Right-click ⇒ Select View current group information of your Facebook account ⇒ Select the groups you want to post to ⇒ Click Save posting information.
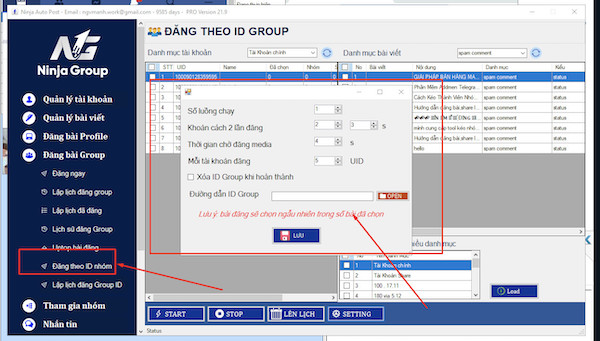
In the group you want to post to, you can choose to post to the group the account has joined or post to public ID groups. By posting using a public group ID file, accounts do not need to join to be able to post in it.
Finally, select Start to post content to the groups you have chosen. So you have completed how to selectively post to Facebook groups.
Above are instructions on how to auto post on facebook groups by Ninja Auto Pos Client software. Hope this article will help you in using the product. You can refer to how to post Facebook posts without being violated to minimize the situation of blocking your Facebook account due to spam.
If you need help, don't hesitate to inbox, Ninjaer will support you. Connect with us for the fastest support:
Zalo: https://zalo.me/0967922911
Whatsapp: http://wa.me/+84967922911
Fanpage: https://www.facebook.com/ToolsNinja


